TnT SIM Registration Online with Link: Simple Steps in 2025
If you are living in the Philippines, then you will definitely know that after the SIM Registration Act, it became essential to register your SIMs. This cautionary step will help to improve your security and privacy and also helps to maintain the records of registered SIM to reduce the rate of crimes.
If you are a TnT SIM user, then you must never ignore registering your TnT SIM card. If you don’t register your SIM, then you will have to face penalties in the form of SIM deactivation.
Therefore, from your hectic routine take some time for TnT SIM Registration and enjoy unlimited rewards and calls minutes.
Let’s explore some quick steps to register your TnT SIM, along with some errors and their solutions!
What is the TnT SIM Registration?
You should know that TnT SIM is a cellular mobile service brand of the company, Smart Communication in the Philippines. The word TnT stands for Talk ’N Text. This SIM service was launched in April, 2000 by Piltel.
The purpose of this SIM launch was to introduce affordable and unlimited calls, data, and text packages, so that everyone can use them. Among its various affordable offers, a few common are Gaan Text 10 and Unlitext Extra 30.
If you have also decided to enjoy the affordable packages of this TnT SIM, then you should first register your SIM card before using it. There are different simple ways to register your TnT SIM cards that will make your registration process fast.
TnT SIM Registration Via Website
When anyone wants to register their TnT SIM, the first method comes to everyone’s mind is through the official website. The reason is it is easy to approach, as you don’t have to download any app and can be done within a few minutes.
Let’s explore the easy steps of TnT SIM Registration via the following website link:
Or you can also click on the given link to open it directly. simreg.smart.com.ph.
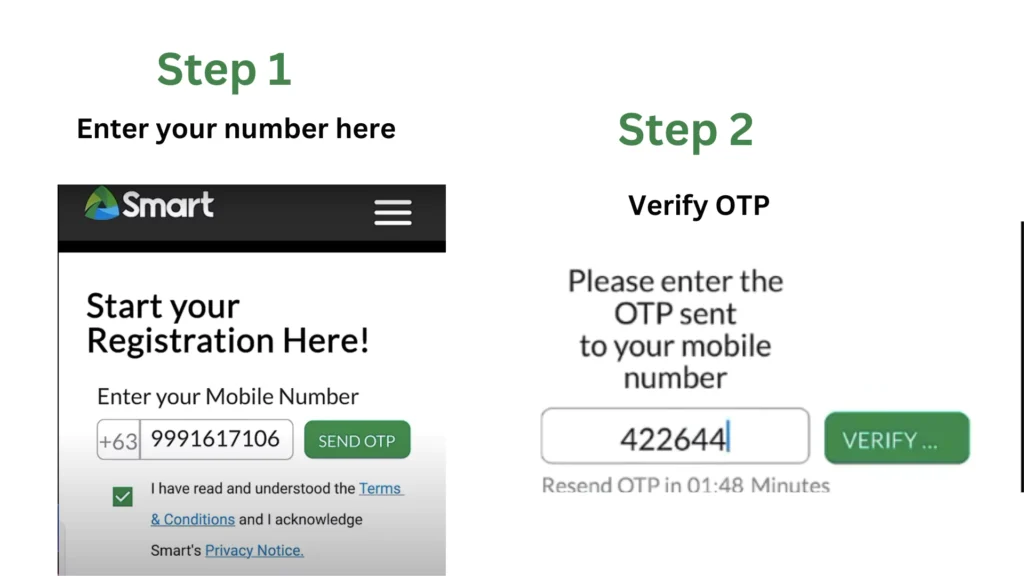
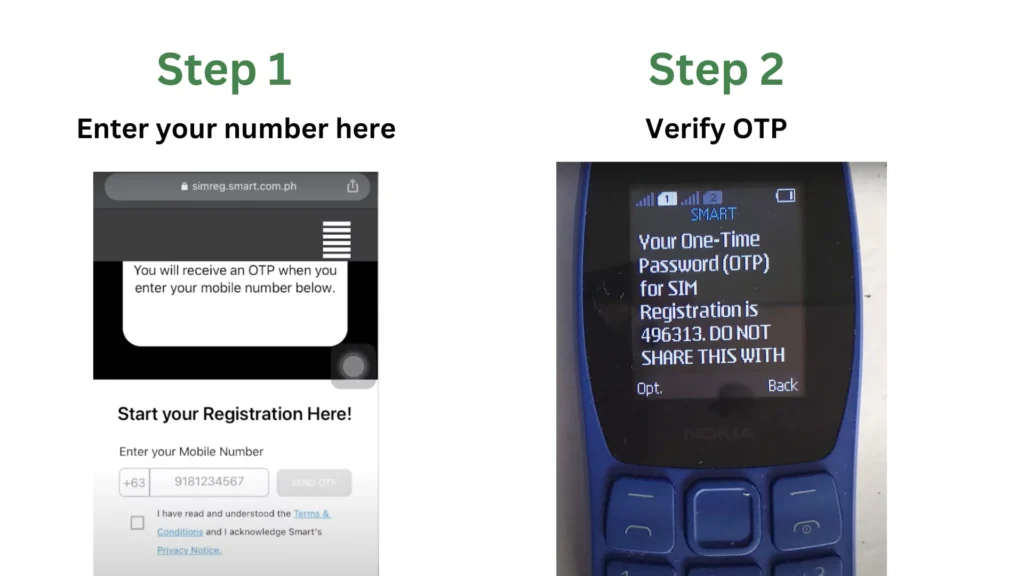
- Now, enter your 11-digit TnT SIM card number and click on the “Send OTP” option.
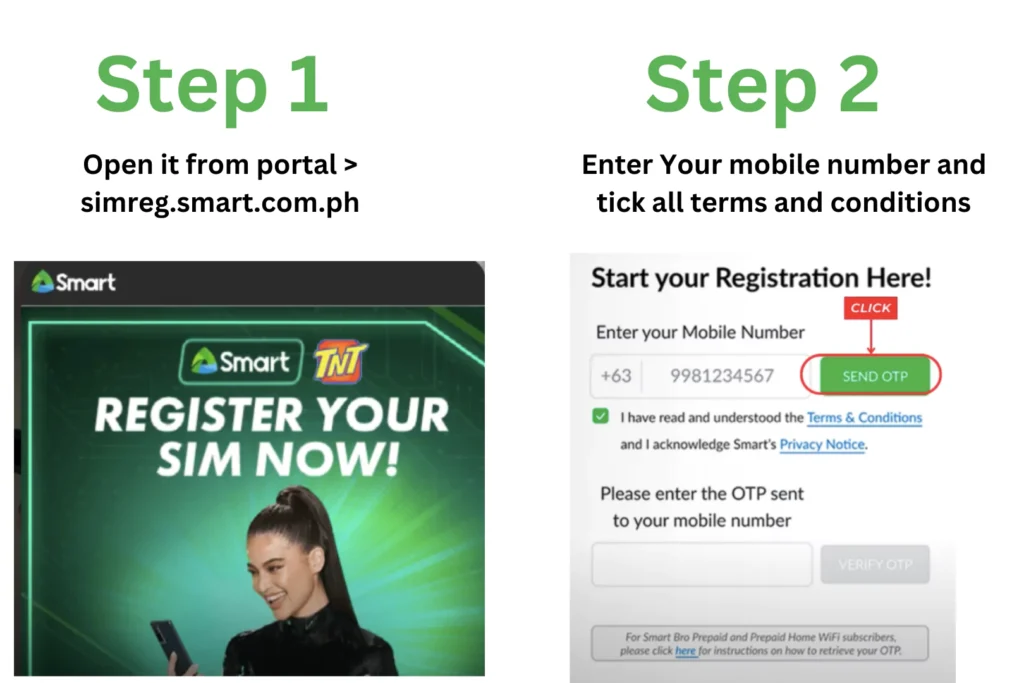
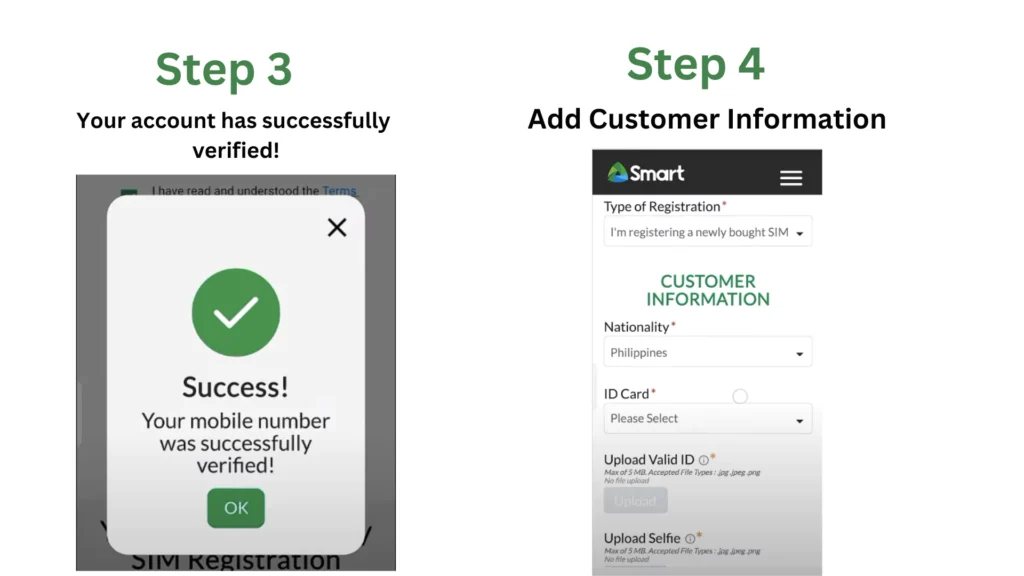
- Within a few seconds, you will receive an OTP Code on your mobile. Enter this 6-digit code and click on verify.
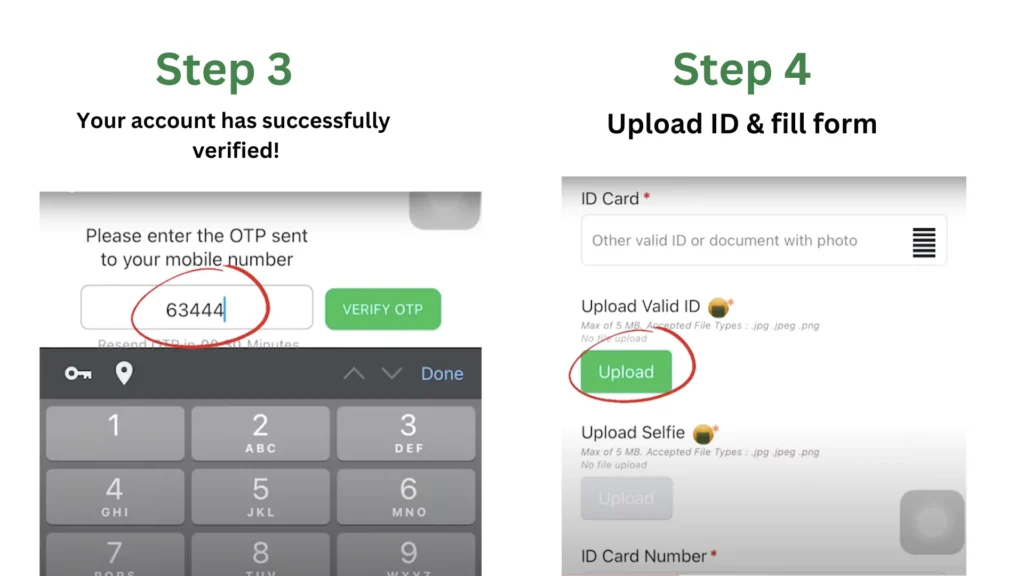
- In the next step, accept all Terms and Conditions by checking the mark.
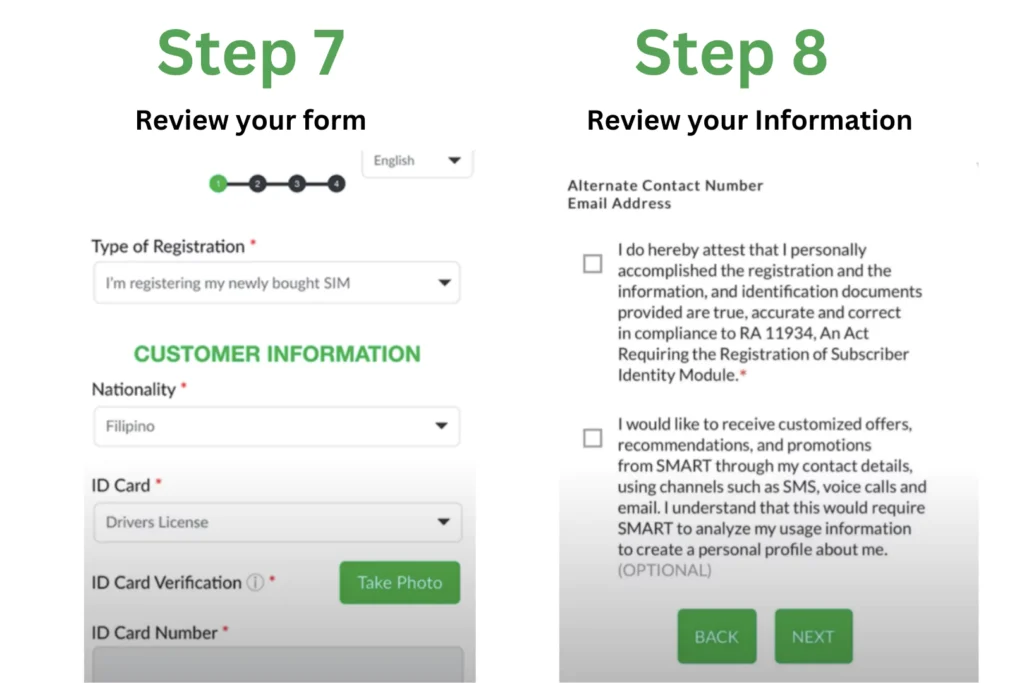
- Now, when your OTP Code is verified, select the type of registration you want. You can register a new SIM or an old SIM.
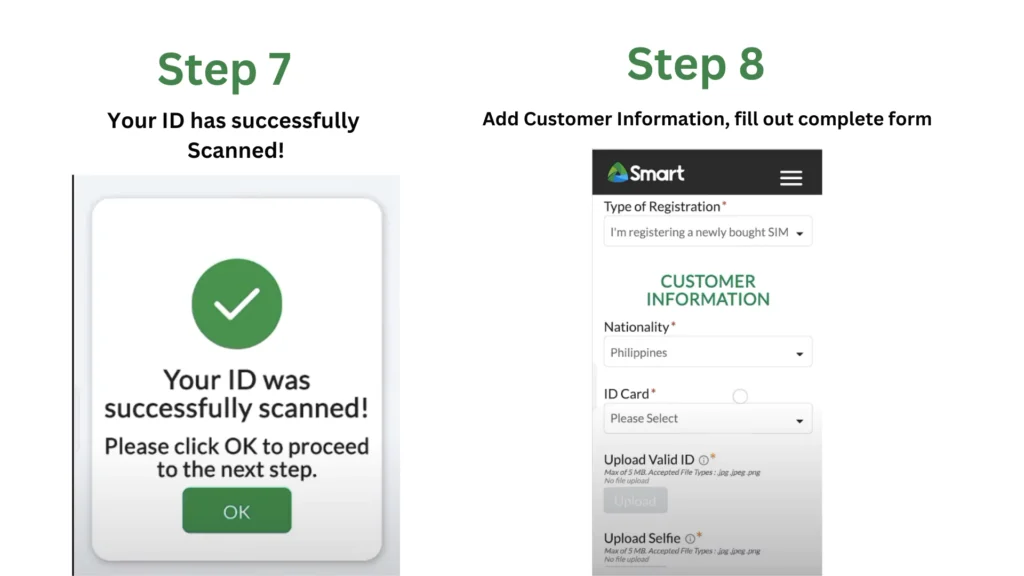
- Now, fill out the form on your Home screen by providing all your correct information. Like, carefully enter your name, address, and date of birth.
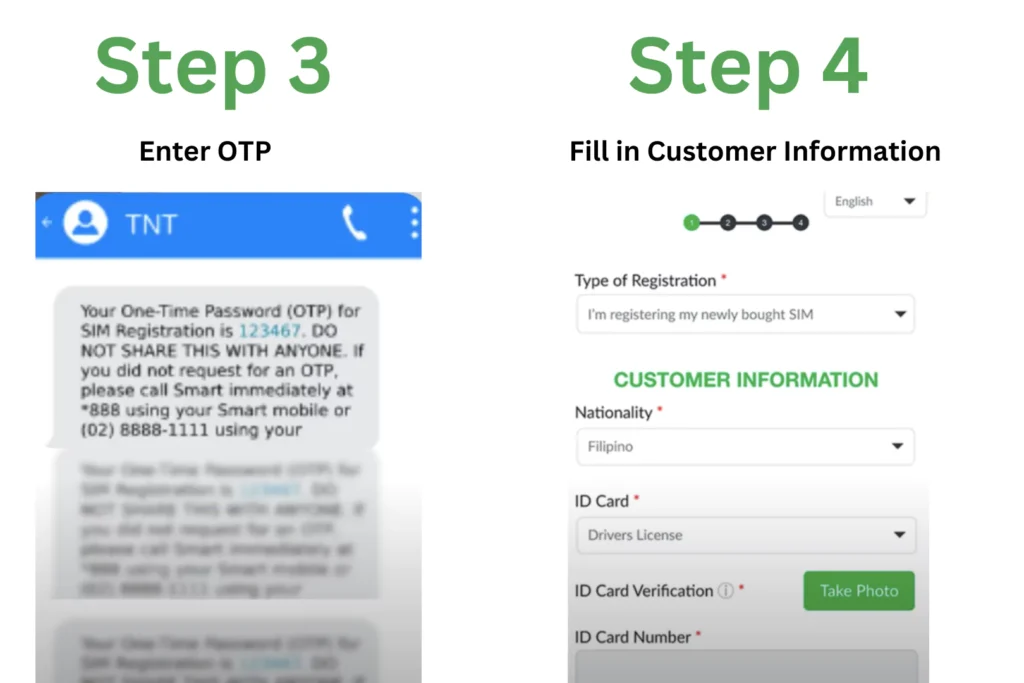
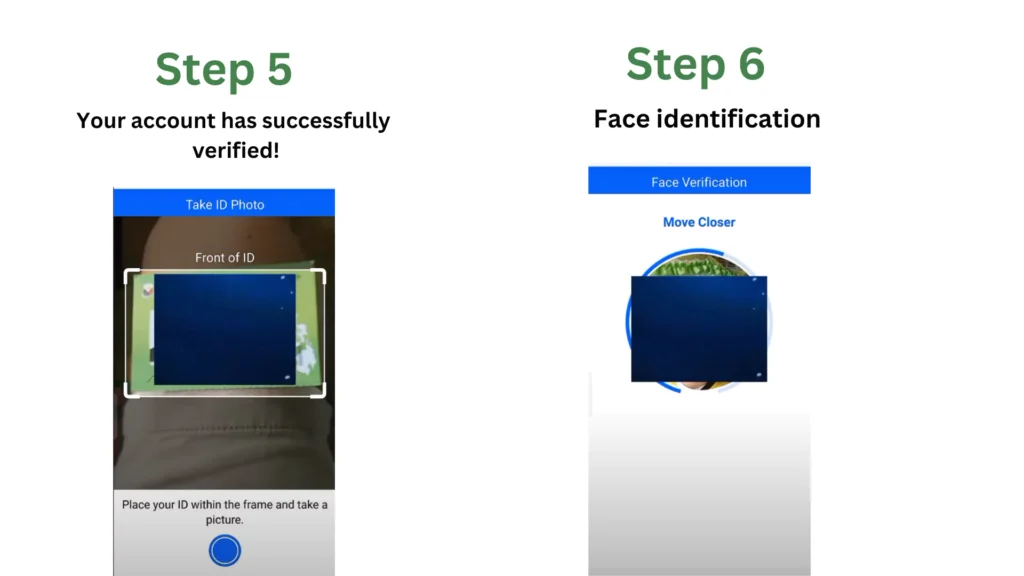
- Now you have to select valid Government ID’s.
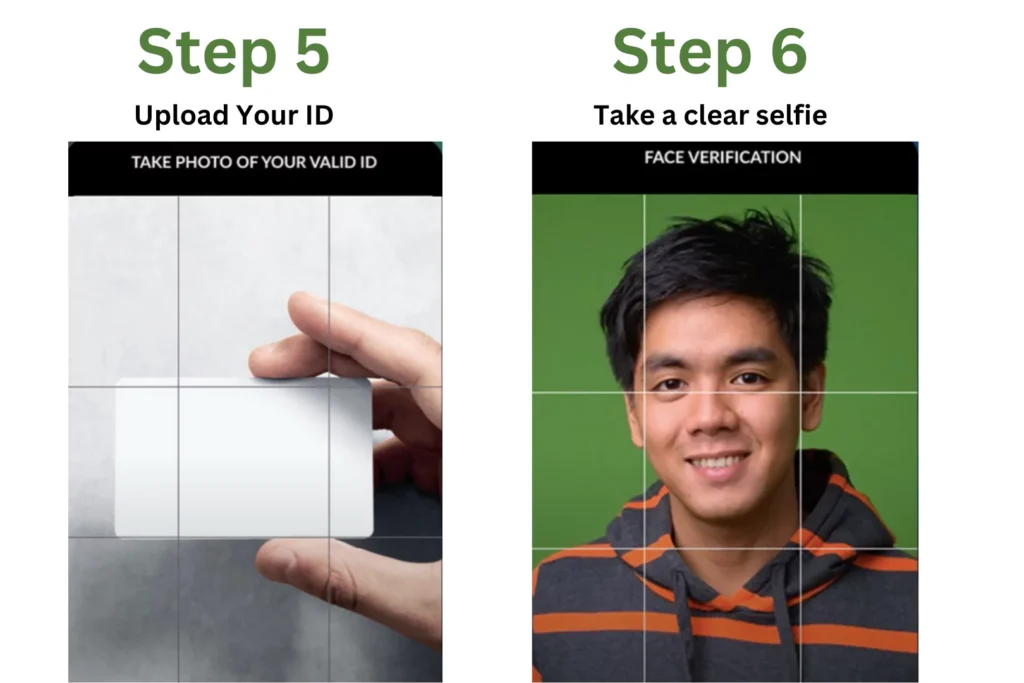
- Now, verify your identity by selecting the type of National ID and uploading your selfie or photo.
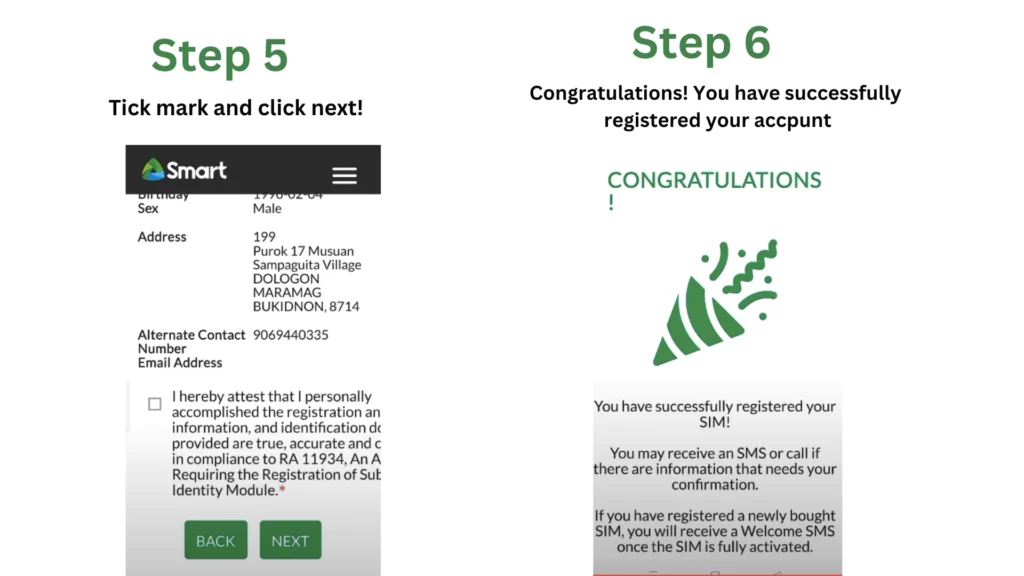
- In the next step, check the box of Terms and Conditions and proceed to the next steps.
- Before submitting the form, you should take a screenshot of your control number. It will help you if your registration fails.
- Now, submit the form for TnT SIM Registration.
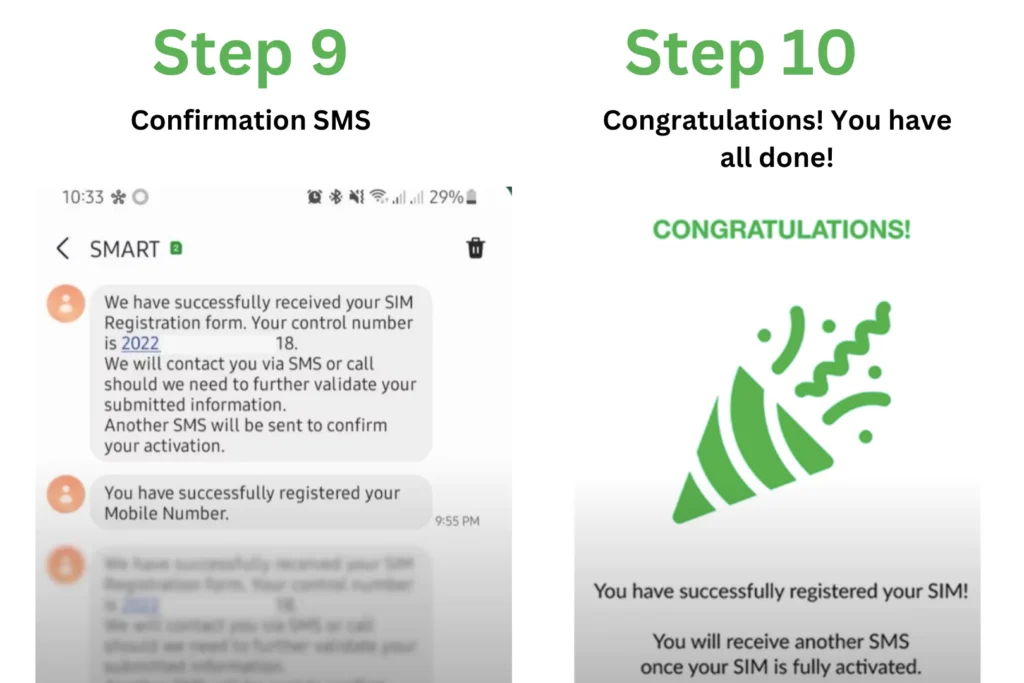
- After completion of the registration process, you will receive a confirmation message from the TnT that your TnT SIM is registered successfully.
- After all this process, you will get a confirmation message “Congratulations” you have successfully register your tnt sim.
TnT SIM Registration Via Mobile App
If you feel that registering your SIM via the online website can be complex then you can register your TnT SIM with the help of a mobile app. For this purpose, you can use the GigaLife app or Smart app on your Android or iOS devices.
- First of all, download the GigaLife or Smart app on your Android or iOS device.
- Then, install the apps on your mobile devices. It will take some time.
- After installation is completed, open the app and click on the “Register Your SIM Now” option.
- In the next step, enter your 11-digit TnT SIM card number in the box.
- Now, check the Terms and Conditions box and click on the register button to move to the next steps.
- Next, you will receive an OTP Code on your mobile number within a few seconds.
- Enter this OTP Code quickly in the box. Otherwise, the code will expire.
- Now, a form will appear on your screen. You should carefully fill out the form with your valid information and comply with the rules of the Philippines Government.
- Capture your National ID card picture size carefully and upload it on the app by clicking on the “Take Your Photo” option.
- Now, take your clear selfie and upload it to the registration app for your ID verification.
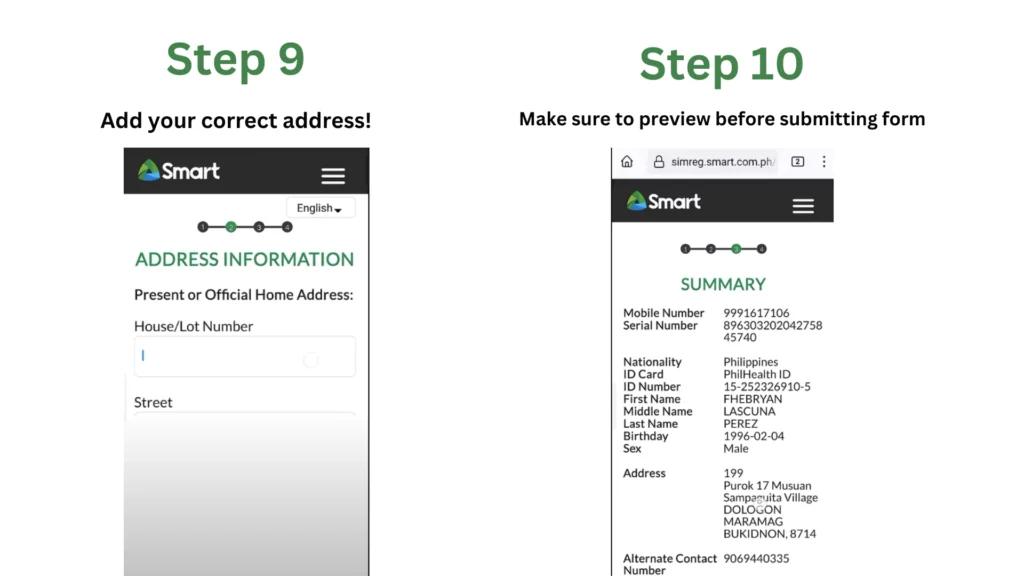
- In the next step, fill out the form and enter your accurate address and zip code by confirming your address with your national ID card.
- After adding the information and address to the form, click on the next option.
- When you have filled out your form, you will receive a summary of the data you have entered. Re-check all the entered information to make sure everything is correct.
- Now, check the box and then click on the submit option.
Congratulations! All your steps for TnT SIM Registration via the app have been completed now.
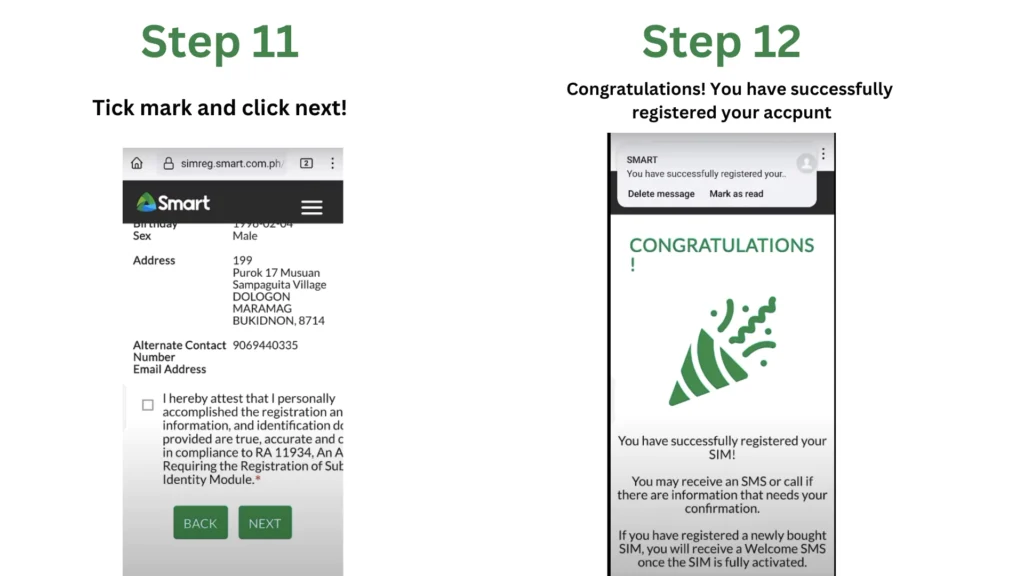
You will receive a confirmation message within a few minutes about your SIM Registration.
TnT SIM Registration for Keypad Mobile Phones
If you have an old keypad mobile phone, then you don’t have to be worried about your TnT SIM card registration, as TnT Telecom has easy steps for you to register your SIM cards.
However, you will need an extra laptop, smartphone or PC to complete the process of registration. Moreover, you can also follow any method to register your keypad mobile SIM from the online website or mobile app.
Let’s follow the simple steps:
- Open the mobile app or official website and enter the mobile number.
- You will receive an OTP Code on your number; enter this code.
- Fill out the form by providing your accurate information, including address, name, and other personal information.
- Verify your identity by uploading your selfie and ID card.
- Accept the Terms and Conditions and submit the form.
- You will receive a SIM registration confirmation message within a few seconds.
Troubleshooting problems of TnT SIM Registration
Here are some common problems that you can face when Registering your TnT SIM. Just have a look at these issues and if you are facing any issue then try to find a solution for yourself.
Failed Registration
Many people often face this issue of failed SIM registration and they can’t understand the reason for this issue. However, when you enter any incorrect information or face an unstable internet connection, then this issue occurs.
To resolve this issue, you should double-check your entered information and also make sure that you have a stable internet connection.
Delayed Confirmation Messages
Sometimes, you will not get the SIM registration confirmation message quickly. It may be due to low network signals or any other reason. In this situation, you should wait for upto 24 hours. If still this issue doesn’t resolve, then you must contact the support team.
SIM Card Deactivation
If for any reason, you have not registered your TnT SIM card, then TnT will deactivate your SIM. So that you won’t be able to make any calls or messages. The only solution for this issue is to quickly register your SIM from your nearest SIM registration office.
SIM Registration Problem by Location
There may be chances that you can face location-specific SIM registration issues. It can be due to a ban of SIM service in your location. To resolve this issue, you can arrange a meeting with the TnT team.
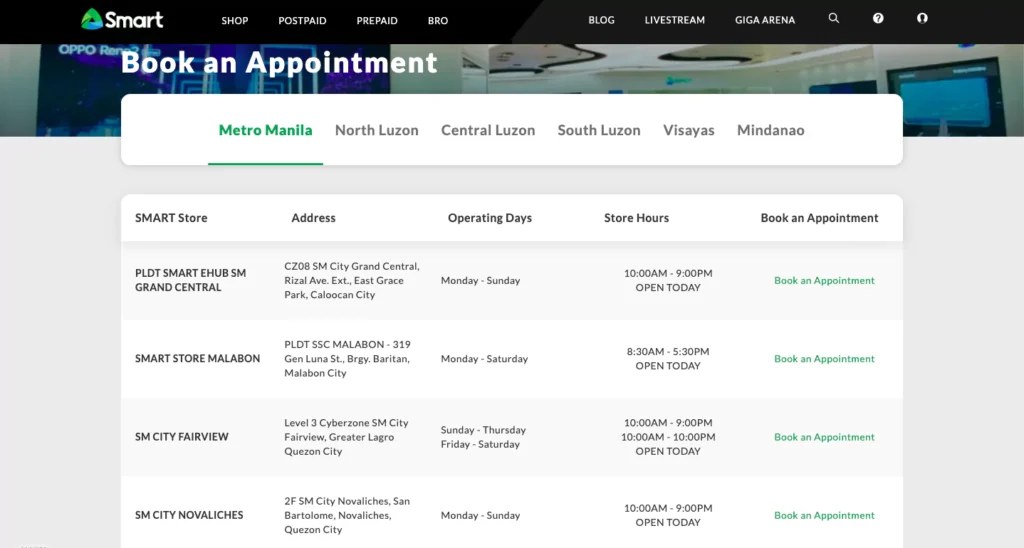
Here are the simple steps to resolve location-specific SIM registration issues:
- From the given link, you should book an appointment for you with the TnT team. https://smart.com.ph/Pages/store-locations
- Now, select your city where you live.
- Next, book your appointment by clicking on the book appointment option.
- From the virtual and In-store options, select any option of your choice.
Gifts After Tnt SIM Registration
If you are already a TnT SIM subscriber, then you don’t have to be worried about your rewards. As TnT is also offering rewards to its old subscribers, the details of these rewards are given below:
- 3 GB of Data
- Unlimited free all-network calls
- Unlimited text messages

For New TnT SIM Subscribers
If you are a new TnT SIM subscriber, the TnT network has a big surprise for you. You will get 21 GB of free data to enjoy browsing your favorite shows or movies.

Required Documents For Tnt SIM Registration
Basic Information
- Your Name
- Date of Birth
- Nationality
- A Selfie Photo
- Philippine National ID Card
- Your Globe SIM Registration Card
- An Active Globe Number
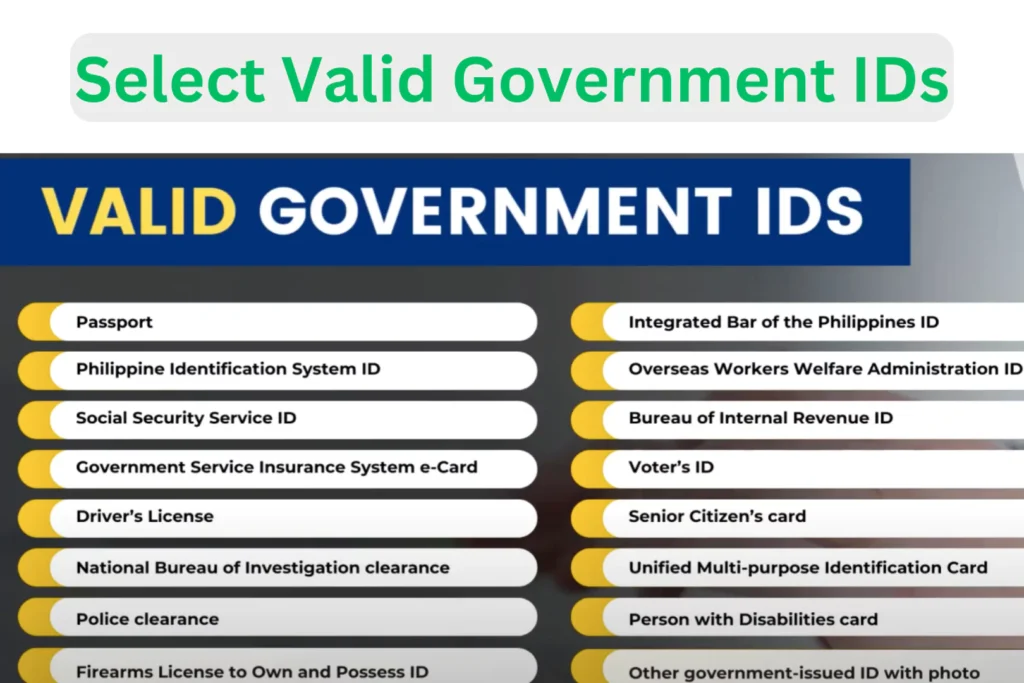
Government Issued IDs
- Passport.
- Bir ID.
- NBI Clearance.
- PRC ID.
- OWWA ID.
- IBP ID.
- Driver’s License.
- Philippine National ID Card
- GSIS ID – Government Service Insurance System.
- Voter’s ID.
- Social Security System (SSS ID)
- PRC ID – Professional Regulation Commission
Additional IDs
- Certificate of Barangay Clearance.
- Senior Citizen ID.
- Postal ID.
- School ID for Students
- PWD ID – Person with Disabilities.
- Company ID for Employee
Different ways to Register TnT SIM in 2025
TnT offers three different ways to register your SIM card. From these different ways you can use any method which suits you best or you consider easy.
Let’s take a quick look at these different ways of TnT SIM Registration:
1. TnT Registration Via Website
The most common and easiest way to register your TnT SIM card is through the official website link. Moreover, it is also considered the safest as it is free of error or any other fraud.
To register your SIM from the website, simply search for the official website, fill out the form, and complete the process to register.
2. TnT Registration Via App

If you want to keep a track of your SIM registration, then you can also register your SIM using the mobile SIM registrations app. One such app is Giga Life available for both Android and iOS devices.
You have to download the app and follow the steps to register your SIM with the help of apps. It is also a simple and quick process for SIM registration.
3. TnT Registration Via Store

However, if you are not much into the technology or facing continuous issues with SIM registration on the website or mobile app, then you can use the third option. This option is to get your SIM registered directly from the store.
The staff will collect some of your basic information and help you to register your SIM easily.
Difference between TnT Regular SIM and E-SIM
There is a major difference between the TnT regular SIM and E-SIM, as the E-SIM is more flexible and can be used on multiple devices.
However, on the other hand, regular SIM, which is physical only works in the devices where it can fit. The regular SIM comes in three different sizes whereas the E-SIM is a digital one that can be installed anywhere.
For convenience, a table of comparison between the two SIMs is given below:
| Feature | Regular TNT SIM | TNT E-SIM |
|---|---|---|
| SIM Type | Physical triple-cut (Regular, Micro, Nano) SIM | Digital eSIM |
| Activation | Inserted inside the phone for activation | Installed directly into your phone via QR code |
| Device | Compatible with 5G, 4G/LTE, 3G, & 2G devices | Compatible with eSIM-capable devices |
Conclusion
SIM Registration has become essential in the Philippines due to the increasing rate of crimes and fraud. However, to comply with the SIM Registration ACT and enjoy an uninterrupted service, you should also focus on your TnT SIM Registration.
In this guide, you can find all the essential steps for TnT SIM card registration and a list of essential requirements. Moreover, you will also enjoy various other rewards when you do your SIM card registration.